1. Make Windows 7 Shut Down Faster
- Type “regedit,” and press “Enter.”
- Navigate to “
HKEY_LOCAL_MACHINE\SYSTEM\CurrentControlSet\Control” and look at the right-hand side of the window. - Modify the value named “
WaitToKillServiceTimeout” to “2000” or some other low value. The default is 12000, which means it waits 12 seconds.

2. Reduce the Amount of Time Thumbnail Previews Take to Show Up
- Type “regedit,” and press “Enter.”
- Open up the registry editor as in the previous step, and navigate to “
HKEY_CURRENT_USER\Control Panel\Mouse“. - Modify “
MouseHoverTime” to 100.

3. Test The Speed of a USB Drive Before Applying ReadyBoost
Not too long ago, we’ve already discussed using Windows 7′s ReadyBoost to add to your RAM. Now, we’ve forgot to mention one question: How fast is that RAM going to be? You’d end up screwing your computer up even more with a slow USB drive on ReadyBoost compared to one with a ton of horsepower. Using your operating system, you can test speed by transferring a large file, but this doesn’t fully test its potential.
That’s where Crystal DiskMark comes in. Once you run the software, it will do a full comprehensive test of any drive on your computer, including SD cards! You can download Crystal DiskMark from its website here.
Make sure you don’t use a USB drive with low specs. Otherwise, you’ll end up with some programs running unbelievably slowly. You don’t want your computer to turn into a snail, do you? Speed is what people use ReadyBoost for in the first place!
4. Speed Up Your Netbook
Let’s get down to business! Go to your Start menu, type “SystemPropertiesPerformance” and hit “Enter.” You should be at a screen like this:

5. Put Your CPUs to Work While Booting!
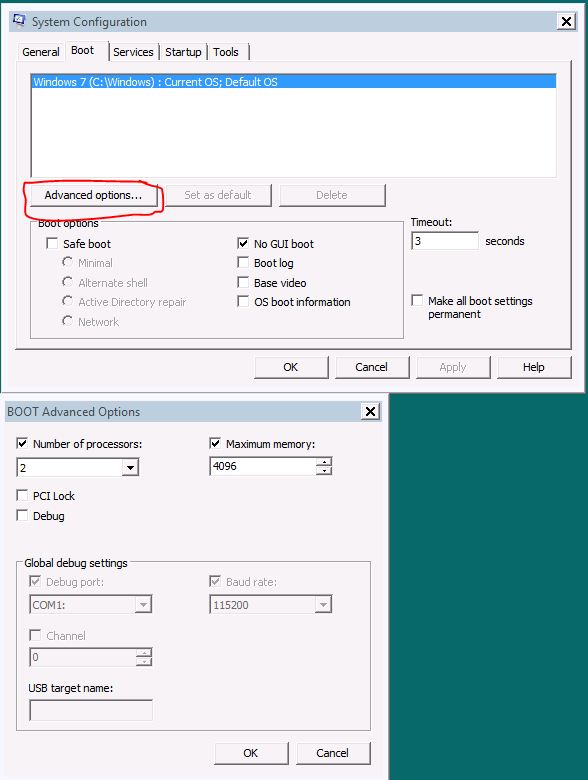
On the majority of computers, Windows adequately sets how many CPU cores a computer can use. However, there are cases when Windows uses only one CPU core to process the entire bootup. Does a carriage go faster with one horse, or four horses? Why don’t you give your computer more horsepower while booting? Let’s put in every core!
Open up MSConfig by clicking the “Start” menu and typing “msconfig“. Click the “Boot” tab in MSConfig and click the “Advanced” button.
Under “Number of CPUs”, give it your all! Select the highest amount of CPUs possible there, as long as you know you have as many processing cores. This will give you a significant boost as long as you can compensate with a high amount of RAM. In Windows 7, we recommend you have 4 GB RAM installed for a quick boot.
6) Defrag your Harddisk (skip this, if you are using SSD)
7) Optimize your antivirus settings (stop unused services, stop unnecessary scanning)
